Ensuring the safety and reliability of your vehicle’s brake system is paramount before hitting the road. This comprehensive guide will delve into the essentials of brake systems, how they function, and the key signs that indicate they are in good working order.
Understanding these aspects can greatly enhance your safety and prevent potential accidents.
Understanding Brake System Basics
Components of a Brake System
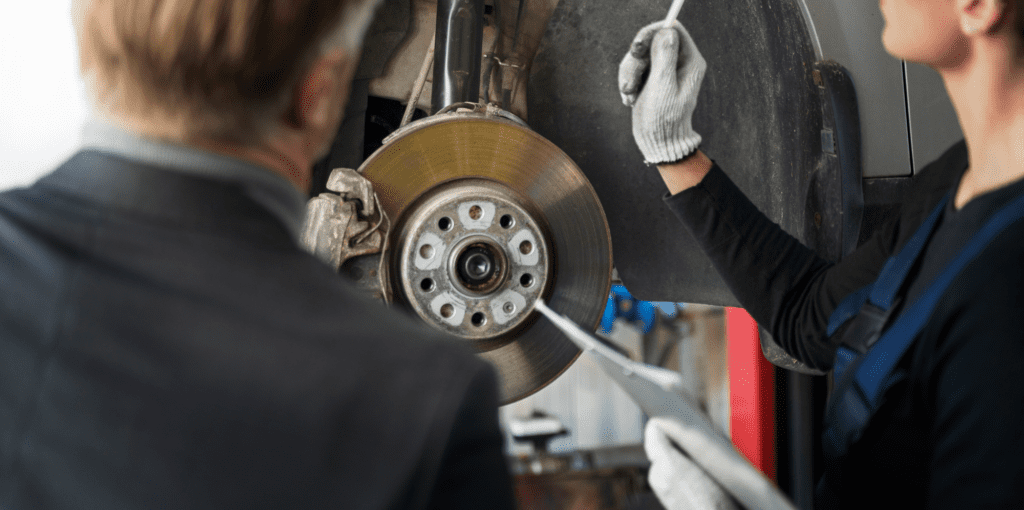
The brake system is crucial for vehicle safety, comprised of several key components that work together to halt your car effectively. These include:
- Brake pads and shoes: These create the necessary friction with the brake rotors and drums to slow down your vehicle.
- Brake rotors and drums: These are the discs that brake pads press against to create friction and stop the vehicle.
- Calipers and wheel cylinders: These apply pressure to the brake pads and shoes, causing them to make contact with the rotors or drums.
- Brake lines and hoses: These transport brake fluid under pressure from the master cylinder to the braking unit at each wheel.
- Master cylinder: This is a hydraulic pump that sends brake fluid to the brake calipers or wheel cylinders when the brake pedal is pressed.
- Brake fluid: This hydraulic fluid transfers force into pressure in the braking system and ensures smooth functioning.
Each component must be in good condition to ensure the entire system functions effectively.
How Brakes Function
The functioning of brakes is based on a simple yet vital principle: hydraulic force. When you press the brake pedal, this action pushes the piston in the master cylinder, forcing the brake fluid through the system’s pipes and hoses to the calipers and wheel cylinders.
This hydraulic pressure causes the calipers and wheel cylinders to press the brake pads against the brake rotors (or shoes against the brake drums), which in turn slows down your vehicle. This system needs to function flawlessly to ensure effective braking.
Signs of a Healthy Brake System
Knowing the signs of a healthy brake system can help you identify when maintenance is needed and prevent brake failure:
- Responsive brake pedal: The brake pedal should feel firm under your foot. A spongy or unresponsive pedal can indicate air in the hydraulic lines or low brake fluid.
- No unusual noises: Squealing or grinding noises during braking can indicate worn brake pads or rotors that need replacement.
- Vehicle does not pull to one side: If your vehicle pulls to one side while braking, it could be a sign of a stuck caliper, collapsed brake hose, or uneven brake pads wear.
- Warning lights: Modern vehicles are equipped with brake warning lights that alert you when there’s an issue with the brake system, such as low fluid levels or worn brake pads.
- Vibration-free operation: If the steering wheel or vehicle vibrates during braking, this may indicate warped rotors which need to be addressed promptly.
Regular Brake Inspections
Scheduling Routine Brake Checks
Routine brake checks are essential for maintaining your vehicle’s safety. It is recommended to have your brakes inspected by a professional at least once a year or every 12,000 miles, whichever comes first.
However, if you often drive in heavy traffic, hilly areas, or harsh conditions, you might need to schedule inspections more frequently.
Regular checks ensure that any potential issues are identified and addressed before they become serious safety hazards.
What Inspectors Look For
During a brake inspection, professionals focus on several key areas to ensure that every component of your brake system is functioning properly. Inspectors typically check:
- Brake pads and shoes: For wear and tear. Pads should not be worn down below the minimum thickness.
- Brake rotors and drums: For warping, cracks, and other damages. They also measure thickness to ensure it is above the minimum specification.
- Calipers and wheel cylinders: For leaks and proper operation.
- Brake fluid: To check its level and quality. Dark, cloudy brake fluid might indicate contamination and need for a change.
- Brake lines and hoses: For leaks, cracks, or wear that could lead to fluid loss or air entering the system.
- Overall system performance: Checking for any signs of uneven wear or malfunction.
DIY Brake Inspection Tips
For those interested in DIY brake inspections, there are several things you can assess at home with basic tools:
- Visual inspection of brake pads: Look through the spaces on your wheel’s hubcap to check the pad thickness. If they appear to be thinner than ¼ inch, they likely need replacing.
- Check brake fluid level: Open the brake fluid reservoir (usually on the driver’s side of the vehicle) and ensure the fluid is within the recommended levels and not cloudy or dark.
- Listen and feel for issues: During driving, listen for any unusual noises when braking. Also, feel for any vibration in the steering wheel, which could indicate rotor issues.
- Wheel spin test: Jack up your vehicle and safely support it with jack stands. Spin each wheel by hand; they should move freely without strange noises or resistance.
Identifying Common Brake Problems
Symptoms of Worn Brake Pads
Worn brake pads are one of the most common brake issues. Symptoms include:
- Squealing or screeching noises: Often caused by a metal shim, known as an indicator, which gives you an audible warning when the pads are too thin.
- Reduced braking performance: If it takes longer to stop than usual, your brake pads might be worn out.
- Visible wear: If inspection of the pads shows less than ¼ inch of material left, they need to be replaced.
Issues with Brake Discs and Drums
Problems with brake discs and drums can significantly affect vehicle safety. Symptoms and issues include:
- Vibrations during braking: Often indicates that rotors are warped, which can happen due to overheating from excessive use.
- Grooves or scoring: Deep lines on discs can indicate dirt or debris between the rotor and pads, or that pads are worn down to the metal.
- Cracks or damage: Any visible cracks in the discs should be addressed immediately as they pose a significant safety risk.
Recognising Brake Fluid Issues
Brake fluid issues can impair the effectiveness of your braking system. Key signs include:
- Soft brake pedal: If the brake pedal feels soft or sinks to the floor, it may indicate a brake fluid leak or air in the hydraulic system.
- Brake fluid leaks: Any signs of wetness or dark spots around the brake lines, master cylinder, or calipers suggest a leak.
- Changes in fluid condition: Brake fluid should be clear or slightly yellowish. If it appears dark or cloudy, it may be contaminated and needs replacing.
The Highway Code and Braking Safety
Key Braking Rules from The Highway Code
The Highway Code includes specific rules designed to ensure braking safety on the road. It emphasises maintaining a safe following distance between vehicles, which allows adequate time and space to stop safely in an emergency.

The Code also stipulates that drivers must ensure their brakes are well-maintained and perform effectively under all conditions. Adhering to these rules is crucial for both legal and safety reasons.
Understanding Stopping Distances
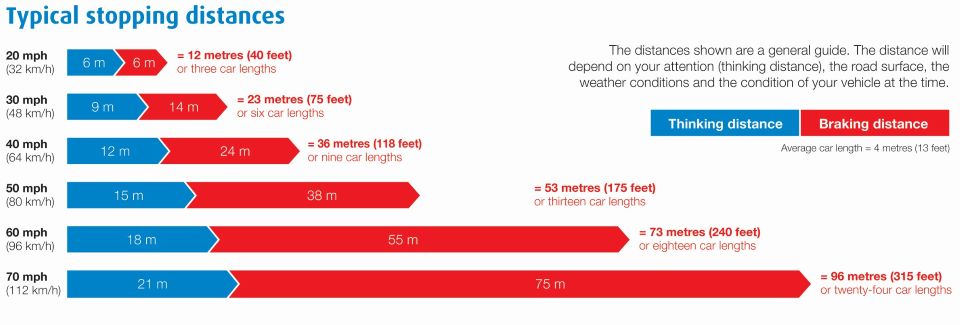
Stopping distances in driving are affected by several factors including speed, road condition, and the effectiveness of the brake system.
The Highway Code provides clear guidelines on typical stopping distances for various speeds, illustrating that the stopping distance is actually made up of two components: the thinking distance and the braking distance.

The thinking distance is the road covered from the moment a driver perceives a hazard to when they apply the brakes, while the braking distance is the distance travelled from the moment the brakes are applied to when the vehicle comes to a complete stop. Understanding these distances is vital for safe driving.
Legal Requirements for Brake Maintenance
Legally, drivers are required to maintain their vehicle’s brakes in good working order. Failure to do so can result in penalties, including fines and points on the driver’s licence.
Regular inspections and maintenance must be documented as part of the vehicle’s service history to comply with vehicle safety standards and regulations.
Ensuring that brakes meet the legal requirements not only keeps you compliant with the law but also significantly enhances road safety.
Brakes are checked as part of your cars annual MOT
Performing Pre-Drive Brake Safety Checks
Checking Brake Fluid Levels
Before setting off on any journey, it is important to check the brake fluid levels to ensure they are within the recommended range. Low brake fluid can lead to a reduction in braking efficiency or complete brake failure.
The fluid reservoir is usually located under the bonnet, and the level should fall between the minimum and maximum marks.
If you find the fluid level is low, it’s crucial to top it up to the appropriate level or visit a mechanic if the fluid is frequently low, as this could indicate a leak.
Testing Brake Response Before Driving
Testing the brake response before you begin driving is another essential pre-drive check. This involves pressing the brake pedal to feel for any sponginess or resistance.
The pedal should feel firm and depress smoothly. If the pedal feels unusually soft or sinks to the floor, this could indicate a serious issue that requires immediate attention.
Testing should be done at a low speed in a safe area, such as a driveway or parking lot.
Listening for Unusual Noises
Listening for any unusual noises when applying the brakes can also indicate if there might be an issue. Common sounds include grinding, squeaking, or squealing.
These noises often suggest that the brake pads are worn out or that there is a misalignment somewhere in the brake system.
Any out-of-the-ordinary sounds should be investigated by a professional mechanic as soon as possible to diagnose and rectify the issue.
Show Me, Tell Me: Brake Checks for Driving Tests
What Examiners Look For in Brake Checks
During a driving test, examiners assess candidates’ knowledge and ability to perform basic vehicle safety checks, which include brakes.
Examiners look for clear understanding and practical demonstration of how to check the brake system’s health.
Candidates must show that they know how to inspect the physical condition of brakes, understand the implications of warning lights, and can articulate what these checks signify about the vehicle’s safety.
How to Perform ‘Show Me, Tell Me’ Brake Tests
The ‘Show Me, Tell Me‘ part of the driving test involves candidates demonstrating practical knowledge of vehicle safety.
For brake checks, this could involve the candidate explaining how to check the brake fluid level and brake pedal condition.
‘Show me‘ may require the candidate to physically check the brake fluid reservoir and comment on its level, while ‘Tell me‘ might involve describing how to assess the brake pedal’s responsiveness before starting a journey.
Effective communication and accurate demonstration are key to success in this portion of the test.
‘Show me, Tell me’ questions for the practical driving test
Tips for Demonstrating Brake Safety Knowledge
To effectively demonstrate brake safety knowledge in a driving test, consider the following tips:
- Prepare thoroughly: Familiarise yourself with your vehicle’s specific features and how to access and evaluate the brake system components.
- Use clear language: Communicate your actions and findings clearly and concisely during the ‘Show Me, Tell Me’ tests.
- Stay calm and confident: Demonstrating confidence in performing these checks can positively influence the examiner’s assessment.
- Practise regularly: Regular practice with the vehicle you will be using for the test will help you perform these checks smoothly and efficiently.
Addressing Brake Issues
When to Replace Brake Components
Knowing when to replace brake components is crucial for maintaining vehicle safety.
Generally, brake pads should be replaced if the pad thickness is less than ¼ inch.
Rotors should be replaced if they are significantly worn down, warped, or if they cannot be resurfaced. It’s also important to replace brake components if you experience consistent squeaking or grinding noises, or if the car pulls to one side when braking.
How to Choose the Right Parts
Choosing the right brake components involves considering several factors:
- Vehicle specifications: Always select parts that match the manufacturer’s specifications for your vehicle.
- Quality of parts: Opt for high-quality parts that may be more reliable and last longer. Though they might be more expensive upfront, they can offer better safety and long-term cost efficiency.
- Reputation of brands: Choose parts from reputable brands known for durability and performance. Reviews and mechanic recommendations can guide these decisions.
Seeking Professional Brake Services
For most drivers, replacing brake components is a task best left to professionals. Seeking professional brake services ensures that:
- The job is done correctly: Professionals have the tools and expertise necessary to replace brake components safely and correctly.
- Safety is prioritised: Proper installation of brake parts is crucial for vehicle safety; professionals ensure that everything is set up to function seamlessly.
- Warranties are maintained: Using professional services helps maintain vehicle warranties, as DIY repairs can sometimes void warranties.
Maintaining Your Brakes for Long-Term Safety
Best Practices for Brake Maintenance
Maintaining your brakes effectively is crucial for ensuring long-term safety on the road. Here are some best practices for brake maintenance:
- Regular inspections: Have your brake system checked regularly by a professional, especially if you notice any issues or if your driving habits involve frequent stopping, which can wear brakes faster.
- Keep brake fluid fresh: Change the brake fluid at intervals recommended by your vehicle manufacturer to prevent moisture accumulation, which can lead to brake failure.
- Clean and adjust brakes: During regular maintenance, have your brakes cleaned to remove any dirt or debris, and adjusted if necessary to ensure they are providing the maximum possible stopping power.
- Listen to your car: Pay attention to any sounds or changes in the braking performance and have your brakes checked if you notice anything unusual like squealing, grinding, or reduced responsiveness.
Avoiding Common Mistakes
Several common mistakes can compromise the effectiveness and longevity of your brake system. Avoid these pitfalls to maintain optimal brake performance:
- Ignoring warning signs: Do not overlook warning lights or any changes in braking performance. Address issues as soon as they arise to prevent more significant problems.
- Skipping regular maintenance: Missing scheduled brake inspections can lead to unexpected failures and reduced brake system life.
- Using low-quality replacement parts: Inferior quality brake pads or other components can wear out faster and perform poorly compared to higher-quality, often more expensive parts.
- Overloading the vehicle: Consistently driving with loads heavier than your vehicle’s recommended capacity can put extra stress on your brakes, leading to quicker wear and potential failure.
Importance of Using Quality Brake Fluid
The brake fluid plays a critical role in the overall performance of your brake system. Here’s why using quality brake fluid is essential:
- Transfers force effectively: High-quality brake fluid is designed to transfer force under high pressure and high temperature, which is crucial for effective braking.
- Prevents corrosion: Good quality brake fluid contains additives that help prevent corrosion and wear of the brake system components.
- Maintains boiling point: Quality brake fluids are formulated to have high boiling points to avoid vaporising within the brake lines, which can cause brake failure.
Using the right type and quality of brake fluid, following best maintenance practices, and avoiding common mistakes are essential steps in ensuring that your brakes remain effective and reliable over the long term.
These practices not only contribute to your vehicle’s performance but also significantly enhance your safety and that of other road users.
Frequently asked questions
If your brake pedal feels spongy, it could indicate air in the brake lines or low brake fluid. It’s important to have your brakes checked by a professional mechanic to address this issue as it can affect braking efficiency.
Brake fluid should generally be changed every 2 years or as specified by your vehicle manufacturer’s guidelines. Regular changes prevent moisture accumulation that can lead to brake failure.
Signs that your brake pads need replacing include a squealing or screeching noise when you apply the brakes, a longer stopping distance, and if the pad thickness is less than ¼ inch.
Yes, you can perform a basic inspection of your brakes to check for wear on the pads and listen for unusual noises. However, for a comprehensive checkup, it is advisable to visit a professional mechanic.
Using high-quality brake parts ensures better performance and safety. They tend to last longer and are less likely to fail, providing reliable stopping power under various driving conditions.
Squealing usually occurs when the brake pads are worn down and need replacing. Grinding may occur if the pads are excessively worn, allowing metal to contact the rotors, which can cause significant damage.
Overloading puts additional strain on your brakes, leading them to wear out quicker and potentially fail due to the increased weight and momentum that require more force to stop.
If your car pulls to one side when braking, it could indicate a stuck brake caliper, a collapsed brake hose, uneven brake pad wear, or an issue with the brake fluid.
It is essential to have this checked by a professional.
Check the brake fluid reservoir located under the bonnet.
The fluid level should be between the “min” and “max” lines. If it’s below the “min” line, you need to top it up to the appropriate level.
No, it is not safe. The brake warning light indicates a significant problem with your braking system. You should have your vehicle checked by a professional immediately to avoid the risk of brake failure.


